
Customers: Bulk Update Customer Settings with the Customer CSV
Need to change the same setting on 50 customers? Skip the clicking. The Customer CSV lets you update settings like delivery methods, payment terms, tax status, and production days for all of your customers at once.
Updating is different from your first import. When you first set up RoasterTools, you used the CSV to add customers. When you update, you're editing customers that already exist, so the file you download already has their info (and their Id) filled in. You change what you need, upload it, and RoasterTools updates those customers in place.
Adding new customers instead? See Customers: Adding, Managing and Deactivating.
Overview
Before you start
A few quick rules will save you a headache:
- Always download a fresh CSV right before you edit. The upload overwrites what's in RoasterTools with what's in your file. If you use an old copy, any changes made since you downloaded it (by you or your team) get rolled back.
- Don't change or delete the Id column. The Id is how RoasterTools knows which customer each row belongs to. A blank Id creates a new customer instead of updating an existing one.
- Don't change the header row. Keep the column names exactly as they are, and don't add a title row above them.
- Use Google Sheets if you can. Excel (especially older versions) can reformat dates, zip codes, and special characters in ways that cause errors.
- Delete rows you don't want to change. You don't have to upload every customer. A smaller file is easier to check and limits the damage if something goes sideways.
How to bulk update customers
- Click your name in the top right corner, then go to Settings > Import & Export.
- Select Customers from the menu on the left.
- Download the CSV. Use Download Wholesale Only if you only want your wholesale customers in the file.
- Open the file in Google Sheets.
- Make your changes using the column guide below. Leave the Id column alone.
- Go to File > Download > Comma Separated Values (.csv).
- Back in Settings > Import & Export > Customers, click Upload CSV and choose your file.
- Watch for the confirmation email, then spot check a few customers to make sure everything landed.
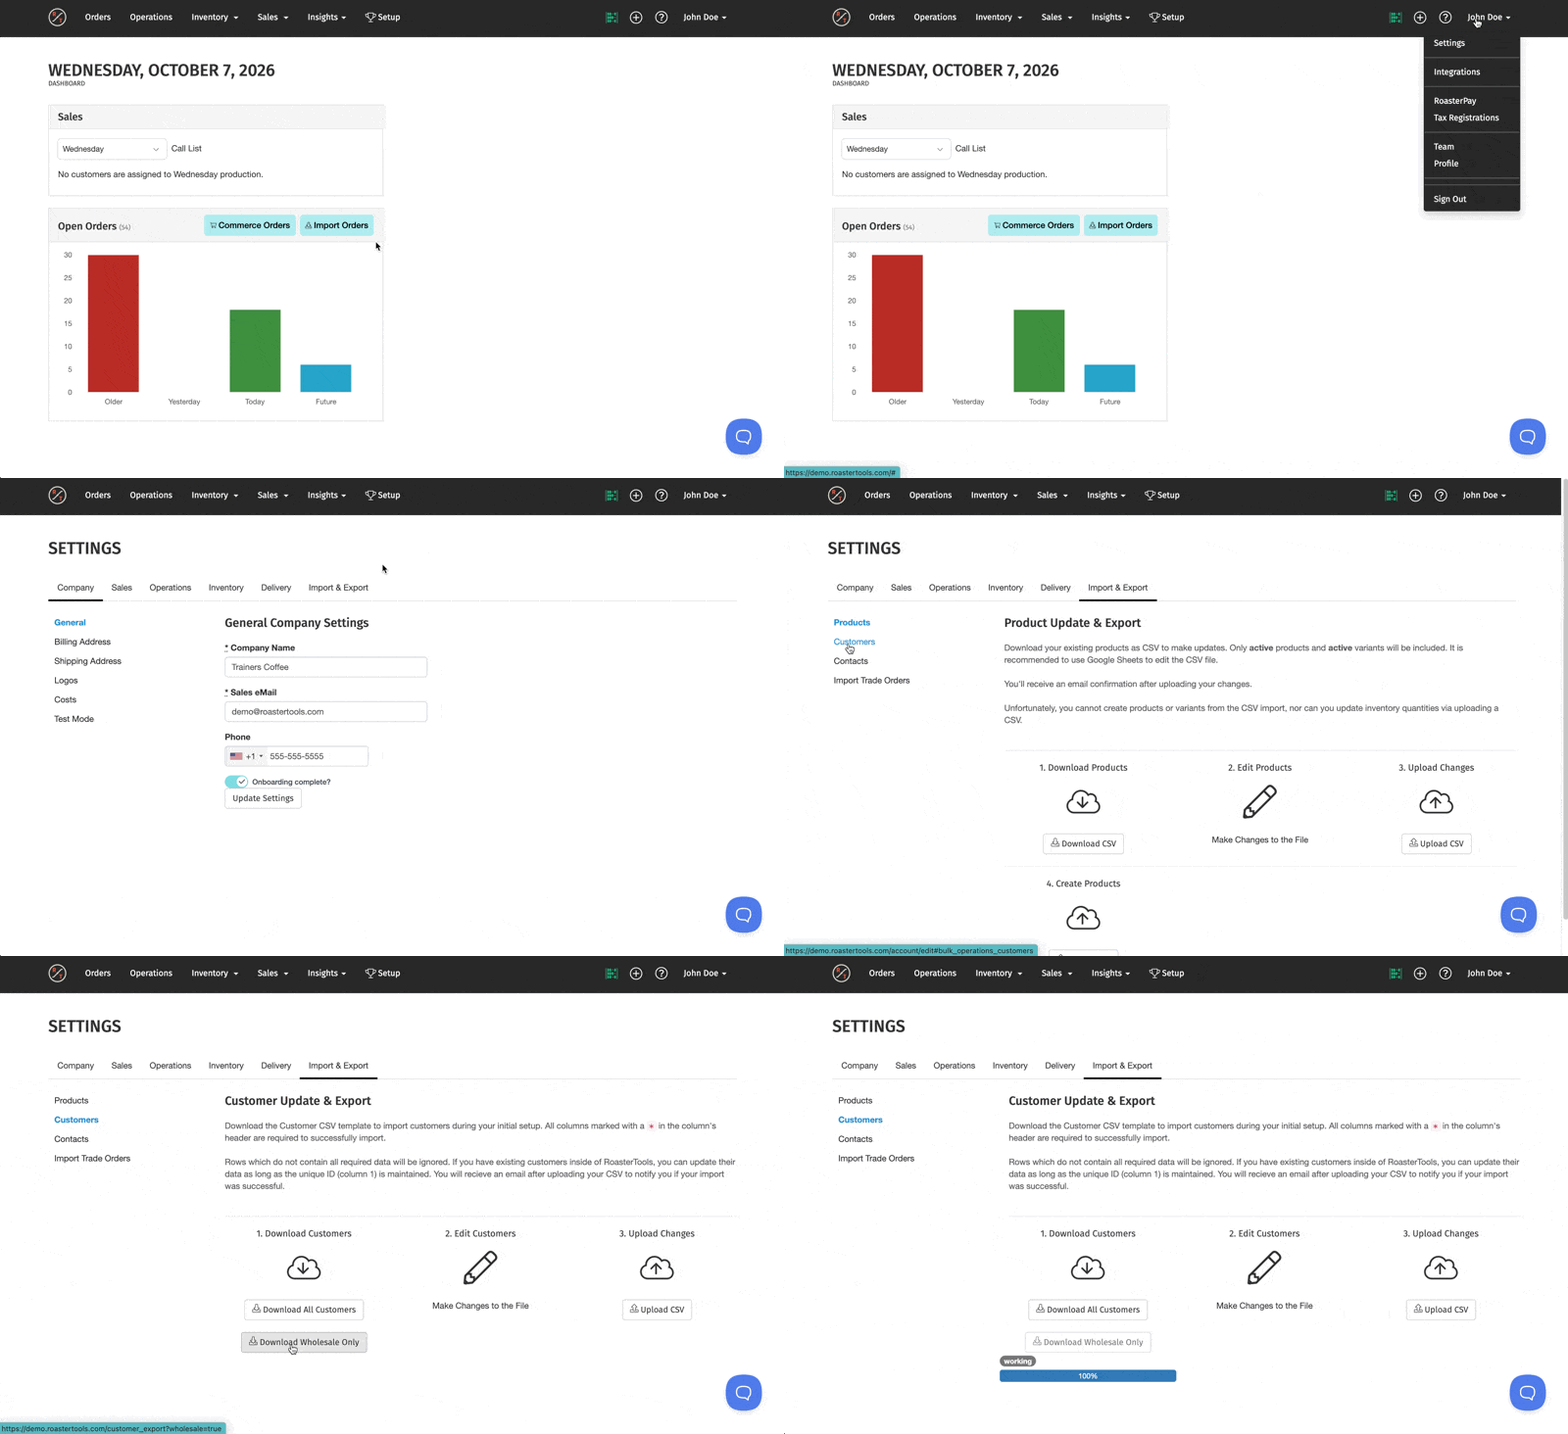
What you can update (column guide)
Columns marked with an asterisk (*) are required and can't be left blank. Shipping ZIP, Shipping Country, Billing ZIP, and Billing Country are also required, even though the file doesn't mark them with an asterisk.
| Column | What it controls | What to enter |
|---|---|---|
| Id | Which customer the row updates | Don't edit. Leave blank only when adding a brand-new customer. |
| * Company Name | The customer's name | Any text |
| Customer Type | The kind of customer | Wholesale or Retail |
| Payment Term | When payment is due | One term, exactly as it appears in RoasterTools (for example: Prepay, Due on receipt, Net 15, Net 30) |
| Payment Types | Which payment methods the customer can use | A comma-separated list, for example: Credit Card, ACH Debit, Check |
| Required Payment Type | A payment method the customer must use | Credit Card or ACH Debit. Leave blank for no requirement. |
| Tax Status | How sales tax applies to the customer | Taxable, Resale, Exemption, Direct Pay, or Manufacturing. See Setting Up Tax Calculation. |
| Price Level | Which price level the customer gets | The price level name, exactly as it appears in RoasterTools. Create your price levels in RoasterTools first. Once they exist, this column will show up the next time you download the CSV. |
| Customer Groups | Which groups the customer belongs to (used for discounts and more) | A comma-separated list of existing group names. Create new groups in RoasterTools first. |
| Default Delivery Method | The delivery method the customer's cart starts with | One delivery method name, matching RoasterTools exactly (capitalization and spaces included). To give a customer more than one option at checkout, see What you can't update with the CSV. |
| Confirmation Emails for Manual Orders | Whether the customer gets a confirmation email when your team creates or copies an order for them. (Older files call this column "Send Invoice Automatically.") | Yes or No. Anything other than Yes saves as No. |
| Last Order Date | For reference only | Leave as is |
| Production Days | Which days the customer's orders are produced | A comma-separated list of days, for example: Monday, Thursday. Leave blank for unassigned. |
| * Shipping Street 1, Shipping Street 2–4 | Shipping address | Street 1 is required |
| * Shipping City, * Shipping State, Shipping ZIP | Shipping address | City, state, and ZIP are all required |
| Shipping Country | Shipping address | Required. The two-letter country code, for example: US or CA |
| Shipping Phone, Shipping Note | Shipping contact info and notes | Any text |
| * Billing Street 1, Billing Street 2–4 | Billing address | Street 1 is required |
| * Billing City, * Billing State, Billing ZIP | Billing address | City, state, and ZIP are all required |
| Billing Country | Billing address | Required. The two-letter country code, for example: US or CA |
| Billing Phone, Billing Note | Billing contact info and notes | Any text |
What you can't update with the CSV
Some customer settings live only on the customer's edit page (Sales > Customers > Edit) or need our help:
- Extra delivery options at checkout. The CSV sets the default delivery method only. To let a customer choose between methods, see Allow a Customer to Choose from Multiple Delivery Options.
- Order minimums. Turn these on per customer. See Order Minimums.
- Order reminder emails. Turn these on per customer. See How to Enable Customers to Receive Sunday Order Reminder Emails.
- Portal layout. Set this per customer on their edit page. See Portal View: Buy Again Page.
- Contacts and email addresses. These use their own CSV. See How to upload and assign Contacts via CSV.
- Accounting class.
Checking your results
After you upload, you'll get an email listing every customer in your file with a Success or Failure. Failures include the reason, so you know exactly what to fix.
The most common ones:
- "Country alpha2 can't be blank" means the country is missing or isn't a two-letter code. Enter US, CA, and so on.
- "Street 1 can't be blank" means a required address line is empty.
- "Province alpha2 can't be blank" means the state is missing or wasn't recognized.
Customers marked Success are already updated. Fix the failed rows, then re-upload just those rows. No need to redo the whole file.
FAQs
Q: Can I upload a CSV I saved a few weeks ago?
A: We don't recommend it. Uploading an old file will overwrite anything that's changed since you downloaded it. Grab a fresh download right before you make changes.
Q: Do I need to include every customer in my upload?
A: Nope! Only the rows in your file get updated. Delete the rows you're not changing.
Q: I don't see a Price Level column. Where is it?
A: The Price Level column only appears once your account has at least one price level set up. Create your price levels first, then download a fresh CSV.
Q: I changed a delivery method name. Do I need to update my customers?
A: If you created a new delivery method (for example, to change its pricing), yes. Download a fresh CSV and update the Default Delivery Method column to the new name.
Q: Will updating a customer's default delivery method change their open cart?
A: Their open portal cart keeps the old method until it's updated. To update an open cart right away, edit the customer and check the box to update their cart on the portal.
Still stuck? Reach out at support@roastertools.com and we'll take a look.