
Accounting: How to Connect to QuickBooks Desktop
QuickBooks Desktop exchanges data with RoasterTools through QuickBooks Web Connector. Web Connector is the QuickBooks application that carries requests between your company file and RoasterTools.
Using QuickBooks Online or Xero? Follow Connect QuickBooks Online or Xero.
Watch the QuickBooks Desktop connection video for a short overview before starting.
QuickBooks Desktop pricing: A QuickBooks Desktop connection is an additional $99 per month.
In this guide
- Prepare QuickBooks Desktop
- Find the company file path
- Start the connection in RoasterTools
- Add RoasterTools to Web Connector
- Complete the initial data exchange
- Choose an ongoing Web Connector routine
Reference: Hosted QuickBooks Desktop and Confirm a returning connection
1. Prepare QuickBooks Desktop
Before starting, make sure you have:
- QuickBooks Desktop open on the Windows computer or hosted desktop that can access the company file;
- the QuickBooks company admin login;
- the company file open in single-user mode (File → Switch to Single-User Mode);
- permission to download and open a QuickBooks Web Connector configuration file, which uses the .QWC file extension; and
- enough time to finish the setup wizard and begin the initial data exchange without closing QuickBooks.
Finish the connection wizard in one session. Setup progress is not saved if you exit before completing the connection steps. Gather the company file path and admin access before starting. After Web Connector is connected and the initial sync is running, you can stop and resume that sync without recreating the setup.
Plan enough time for installation and the initial sync
Install and connect Web Connector: Set aside 30 to 60 minutes of uninterrupted time to complete the connection steps.
Run the initial sync: Once Web Connector is connected and running, the initial sync duration depends on the size of the QuickBooks company file:
- Small files: 2 to 4 hours;
- Medium files: 4 to 12 hours;
- Large files (1 GB or larger, with 1 million or more records): 12 hours to multiple days; and
- Very large files (1.5 million or more records): may require multiple overnight runs.
Start during quiet hours or near the end of the day so the exchange can continue without interrupting normal QuickBooks work.
Know what progress looks like
Web Connector's Application Progress and Total Progress percentages can remain at 33 percent for hours and then finish suddenly. This is normal. Watch the status message instead. If messages such as Sending request to QuickBooks continue to change, the exchange is still working.
2. Find the company file path
- In QuickBooks Desktop, open the company file you want to connect.
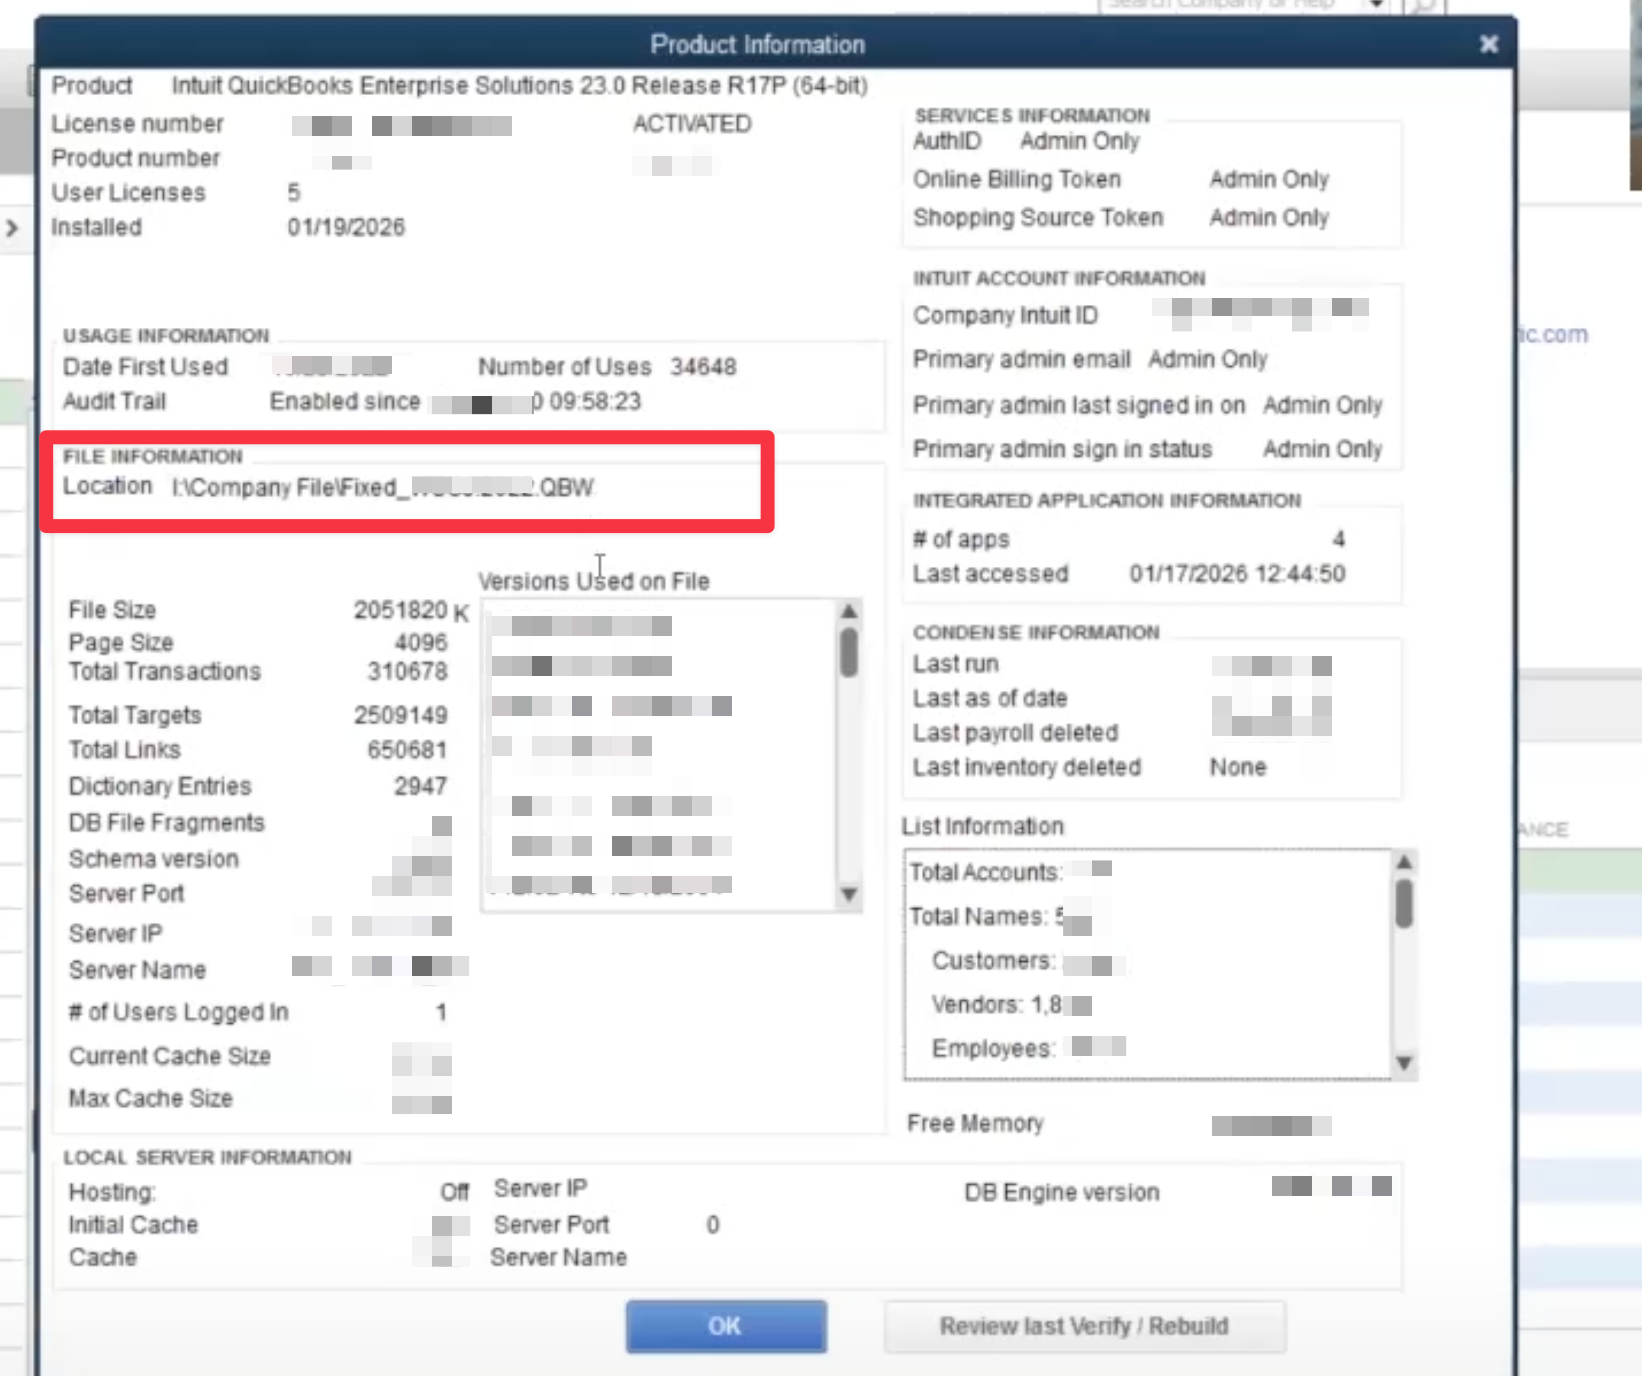
- Press F2. If that does not open Product Information, press Ctrl+1.
- In File Information, find the company file location.
- Copy the full path so you can paste it into RoasterTools.
- Close the Product Information window.
The Product Information window also shows the QuickBooks product name, version, license number, and number of user seats. For this setup, copy the full company file location shown in that window.
3. Start the connection in RoasterTools
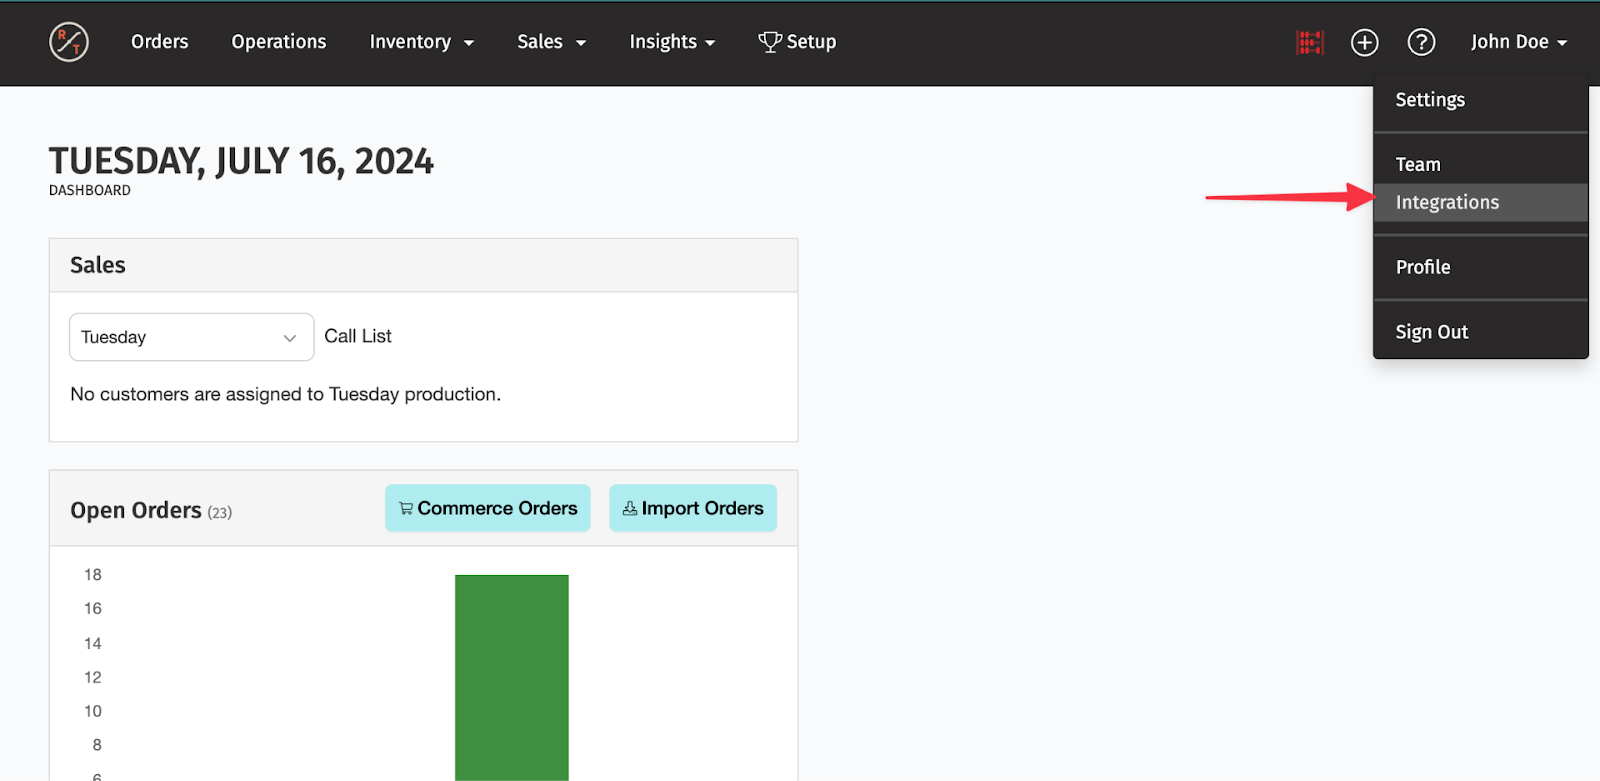
- In RoasterTools, open Integrations.
- Select Add an integration → Accounting.
- Next to QuickBooks Desktop, select Create a connection.
- Follow the setup wizard and enter the company file path when asked.
- Download the .QWC file provided by RoasterTools.
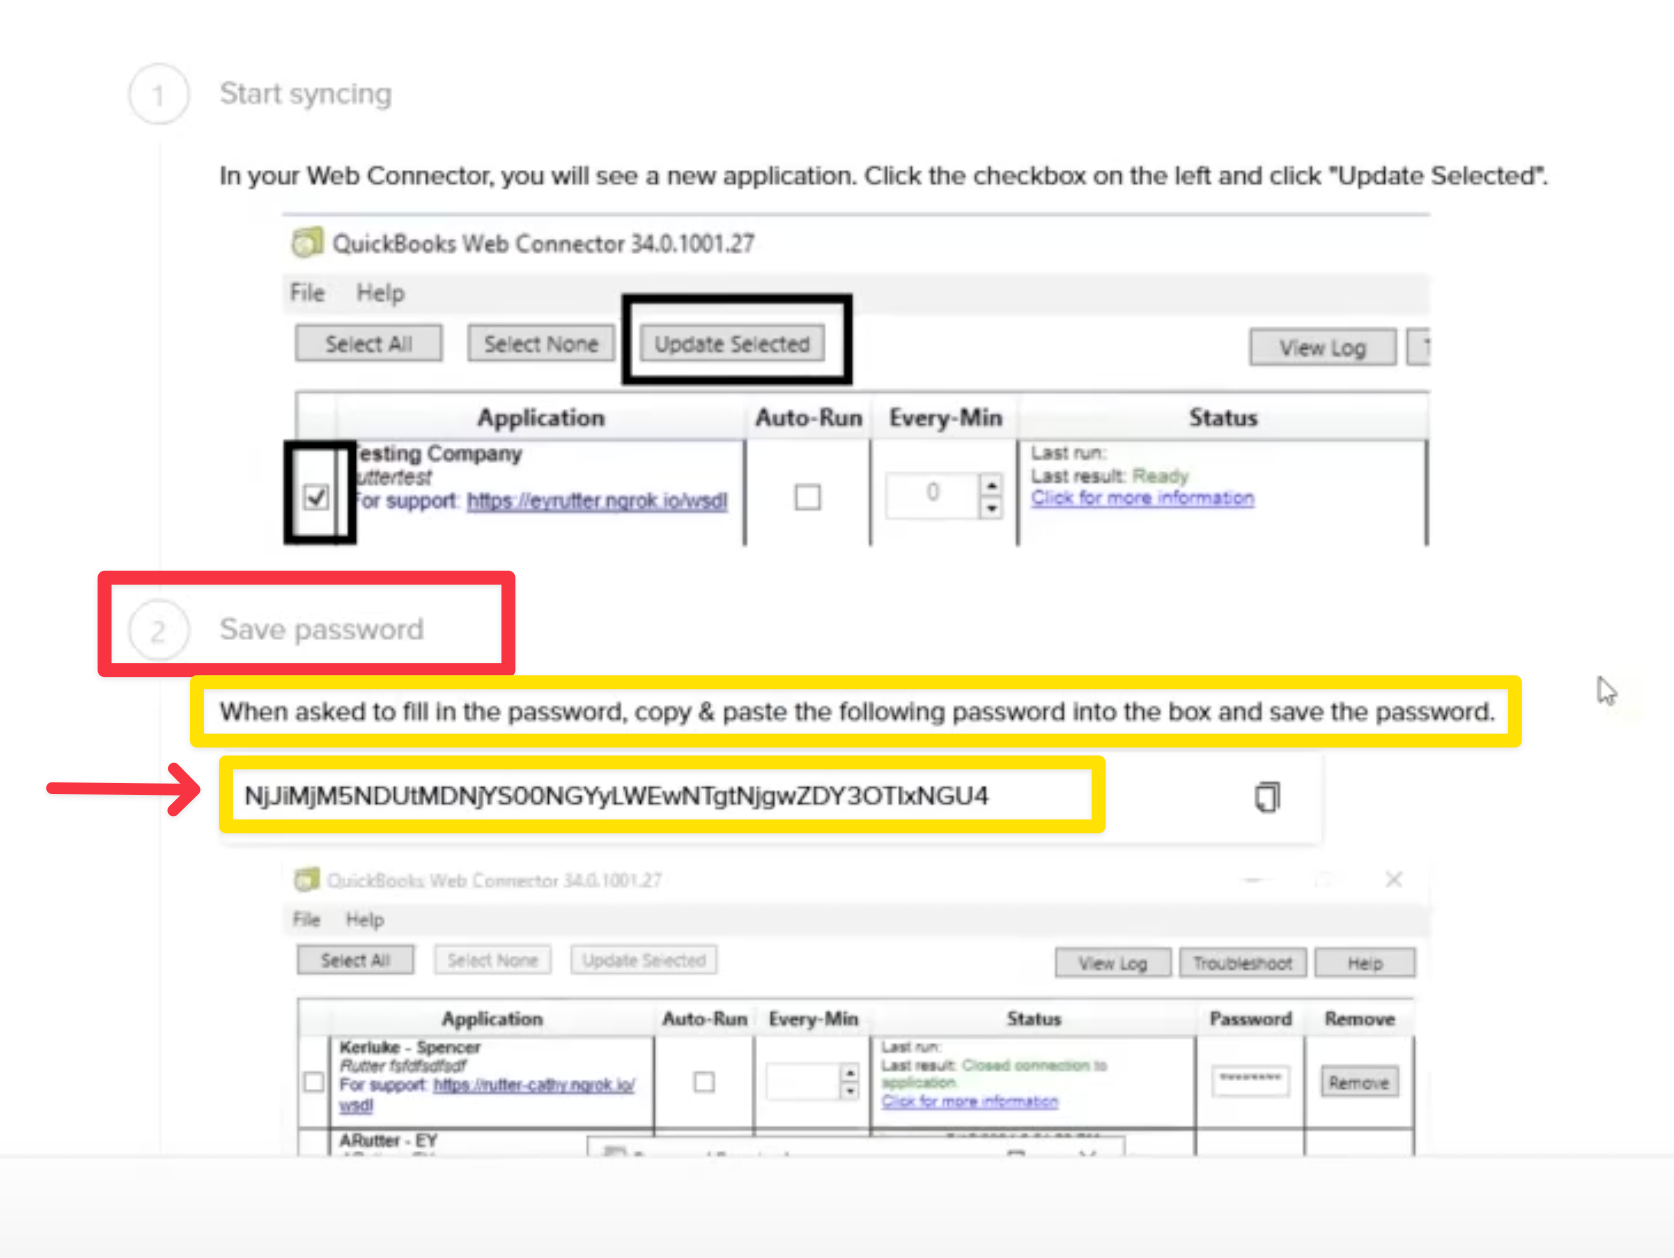
- Keep the unique Web Connector password shown by the setup wizard available for the next step.
Use the password from the RoasterTools setup wizard. It is not your RoasterTools login or QuickBooks password.
4. Add RoasterTools to Web Connector
Close Product Information, folder windows, and other extra QuickBooks windows before opening the downloaded file. Extra windows can interfere with the authorization prompts.
- Close extra QuickBooks windows, but keep the correct company file open.
- Open the downloaded .QWC file. QuickBooks Web Connector opens.
- Approve the QuickBooks prompt to add the application.
- When QuickBooks asks how RoasterTools may connect, choose the option that always allows access, including when QuickBooks is not running.
- In Web Connector, enter the unique password from the RoasterTools setup wizard.
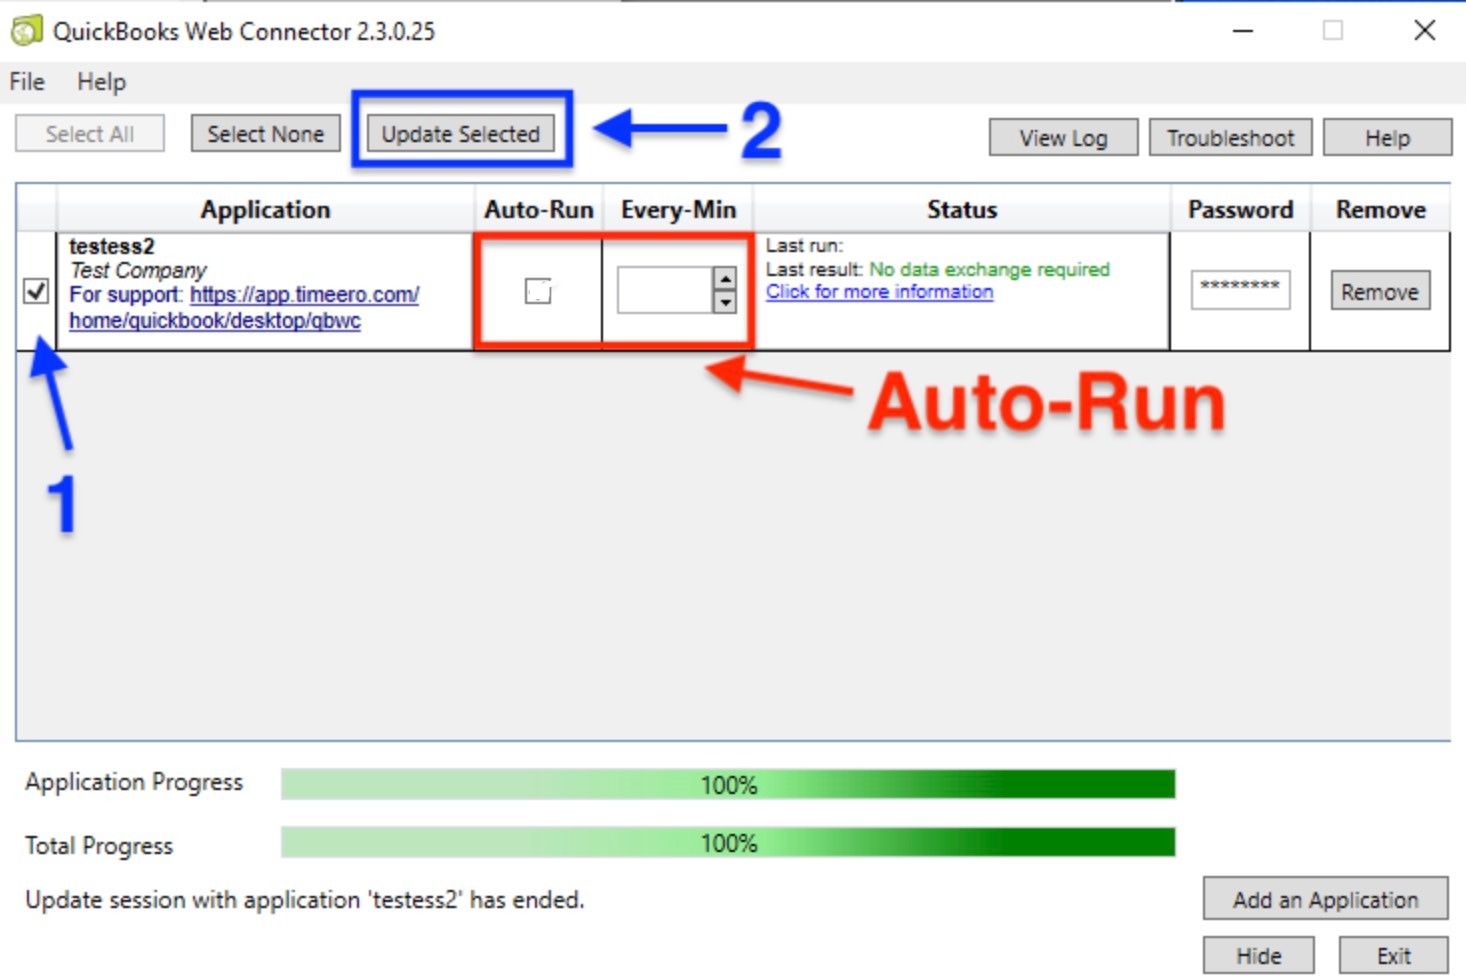
- Leave Auto-Run off for the initial data exchange.
- Select the RoasterTools application and choose Update Selected.
Why QuickBooks asks to always allow access
This setting allows Web Connector to sync automatically without someone manually opening QuickBooks for each update. RoasterTools accesses the records needed to create invoices and sync customers. It does not access personal data, Social Security numbers, or banking information. You retain control of the update frequency and schedule.
The password is rejected
If Web Connector reports that the host application password is incorrect, return to the open RoasterTools setup wizard and use Copy Password again. Enter that unique password in Web Connector. Do not substitute your RoasterTools login password or QuickBooks password.
The connection stops with an error
Take a screenshot that includes the Web Connector application, status message, and error text. Send it to your RoasterTools implementation contact or support@roastertools.com.
You need to stop an exchange
After RoasterTools has been added to Web Connector, you can stop the running exchange from Windows Task Manager. Press Ctrl+Alt+Delete, open Task Manager, select QuickBooks Web Connector, and choose End Task. Reopen QuickBooks and Web Connector later, then choose Update Selected to continue.
5. Complete the initial data exchange
The first exchange can take longer than later ones because RoasterTools is importing the records needed by the connection. A progress percentage can remain unchanged while the status message continues to update.
- Leave QuickBooks Desktop and Web Connector available while the selected update runs.
- After it completes, select Update Selected again to process any follow-up work.
- In RoasterTools, open the accounting connection.
- Confirm that imported QuickBooks customers and items begin appearing in the connection.
- Open Mappings → Customers and confirm that QuickBooks customers are available for mapping.
- Run another selected update when RoasterTools or Web Connector still shows queued initial work.
After Web Connector finishes, imported customers and items can still take a few hours to finish appearing in RoasterTools.
After the initial records are available, run two or three manual updates to confirm that the connection continues to complete successfully. A returning update with no large backlog should normally complete in 60 seconds or less before you enable Auto-Run.
If you stop after the connection has been added to Web Connector, the setup does not need to be recreated. Reopen QuickBooks and Web Connector later, then run Update Selected again.
The connection step is complete when RoasterTools is present in Web Connector and imported QuickBooks records are available in the accounting connection.
6. Choose an ongoing Web Connector routine
Web Connector must continue running to carry queued invoices, payments, and imported data between the systems.
Automatic updates
After the initial exchange completes successfully, you can enable Auto-Run for RoasterTools. Use an interval from 15 to 60 minutes and make sure one update can finish before the next begins. Do not use an interval shorter than 15 minutes. A 30-minute interval is a common starting point.
Keep Web Connector open on the computer that runs the connection. If Web Connector closes or the computer restarts, reopen it for Auto-Run to continue.
Manual updates
If your team does not use Auto-Run, open Web Connector on a regular schedule, select RoasterTools, and choose Update Selected. Run it again when an invoice and its payment are waiting as separate steps.
Review connection status in RoasterTools
Open Integrations to review the status and health of the QuickBooks Desktop connection.
- The Health column shows when the connection is syncing or requires attention.
- If the connection needs to be reauthorized, open its three-dot menu and select the reconnect option.
- The same menu includes the option to disconnect the connection.
For more detail, follow connection health and reconnection guidance.

Complete the remaining accounting setup
Before syncing orders, continue with Set up accounting sync. It guides you through the applicable settings, QuickBooks Desktop sales-tax preparation when needed, optional customer import, required mappings, and one representative invoice before a larger sync.
Hosted QuickBooks Desktop
Right Networks and similar services host QuickBooks Desktop on remote servers instead of an office computer. This allows teams to access QuickBooks remotely, share the company file, use provider-managed information technology and backups, and give accountants remote access. Similar providers include Summit Hosting, Swizznet, and gotomyerp.
A hosted QuickBooks company file still requires Web Connector. Hosting changes where QuickBooks runs; it does not replace the application that carries data between QuickBooks and RoasterTools.
| Setup | Where QuickBooks runs | Where Web Connector runs | Does Auto-Run usually work? |
|---|---|---|---|
| Local QuickBooks Desktop | Office computer | Office computer | Usually |
| Hosted QuickBooks Desktop | Hosting provider's servers | Local computer or hosted desktop | Often restricted |
When hosted Auto-Run is restricted
Right Networks and similar hosting providers often restrict Web Connector's Auto-Run feature. If automatic updates are unavailable, run them manually:
- Sign in to the hosted desktop, or open Web Connector on the computer where the provider supports it.
- Open QuickBooks Web Connector.
- Select RoasterTools and choose Update Selected.
Web Connector may run inside the hosted desktop or on a supported local computer:
- Hosted desktop: Everything remains in one place, but someone must be signed in to run updates.
- Local computer: Updates can run without signing in to the hosted desktop, but the local computer must remain on.
Confirm the supported placement with the hosting provider, then establish a manual routine when Auto-Run is unavailable:
- choose a regular daily or weekly update time;
- set a calendar reminder;
- designate a backup person who can run Web Connector; and
- avoid running a large update while others are actively using QuickBooks.
Confirm a returning connection
After a gap in updates, confirm that Web Connector is still connected even when the RoasterTools connection appears active.
- Open QuickBooks Desktop and the connected company file.
- Open QuickBooks Web Connector. Depending on the QuickBooks version, it may be available from File → App Management → Update Web Services or from Windows.
- Confirm that RoasterTools appears in the Application list. If it is missing, contact RoasterTools support to set up the connection.
- If RoasterTools is present, select it.
- Leave Auto-Run off while the first catch-up update runs.
- Choose Update Selected.
If Web Connector has not run recently, the first catch-up update may take several minutes.
For a healthy returning connection with no large backlog, confirm that the update reaches 100 percent, shows green status indicators, and normally finishes within 60 seconds. If the first catch-up exchange takes longer, allow it to finish and run another update before judging the normal connection speed.
After confirming quick, successful updates, enable Auto-Run and use an interval from 15 to 60 minutes.
Need help?
If RoasterTools does not appear in Web Connector, or updates still fail after following these steps, contact support@roastertools.com.