Accounting: How to Connect to Quickbooks Desktop
If you are looking for the instructions for Quickbooks Online - view this article.
Overview:
- Before Starting
- Before you Begin - Requirements
- Timing and Duration
- What to Expect
- If Something Goes Wrong
- Find our Quickbooks File Path
- Connecting Quickbooks Desktop to RoasterTools
- After Your Initial Sync Completes
- Connection Status
-
Other Things Regarding Quickbooks Desktop
📣 Watch this Video 🎥 {link here} first for a quick overview of connecting to Quickbooks Desktop.
Note: A connection to QuickBooks Desktop is an additional $99/month.
Before Starting:
Before You Begin - Required
Make sure you have all the items below before beginning the connection process.
⚠️ Setup progress is NOT saved if you exit before completing all steps to connect (but you can exit when it's syncing). Have everything ready before starting.
- Admin login credentials for QuickBooks Desktop (not just any user login)
- Single-user mode enabled (File → Switch to Single-User Mode)
- 30-60 minutes of uninterrupted time to complete setup
- QuickBooks file path ready (see instructions below)
Timing & Duration
- Schedule for end of day: Do the initial sync during quiet hours or at the end of the day so it can run overnight if needed
- Initial sync duration depends on file size:
- Small files: 2-4 hours
- Medium files: 4- 12 hours
- Large files (1GB+, 1 million+ records): 12 hours - multiple days to sync
- Very large files (1.5M+ records): May require multiple overnight runs
What to Expect
- Progress bars are unreliable: The "Application progress" and "Total progress" bars may show 33% for hours, then suddenly complete. This is normal. Watch for changes in the status message (e.g., "Sending request to QuickBooks") instead—as long as the status is changing, the sync is working.
- Don't enable auto-run yet: During the initial sync, leave "Auto-Run" unchecked. You'll enable this after the first sync completes successfully.
If Something Goes Wrong
During the setup Phase:
- ⚠️ Important: The setup wizard does NOT save your progress if you exit before completing all steps. If you need to stop (e.g., waiting for admin credentials), you'll restart from the beginning. The process only takes 20-60 minutes once you have everything ready.
During the Sync Phase:
- To stop a sync: Use Task Manager (press Ctrl + Alt + Delete), find QuickBooks Web Connector, and click "End Task." This won't break anything—the sync will pick up where it left off when you restart.
- If the sync fails: Take a screenshot and send it to your implementation contact or support@roastertools.com
Find Your QuickBooks File Path
You'll need your company file path during setup. To find it:
- Open QuickBooks Desktop
- Press F2 on your keyboard
- If F2 doesn't work: Try Ctrl + 1
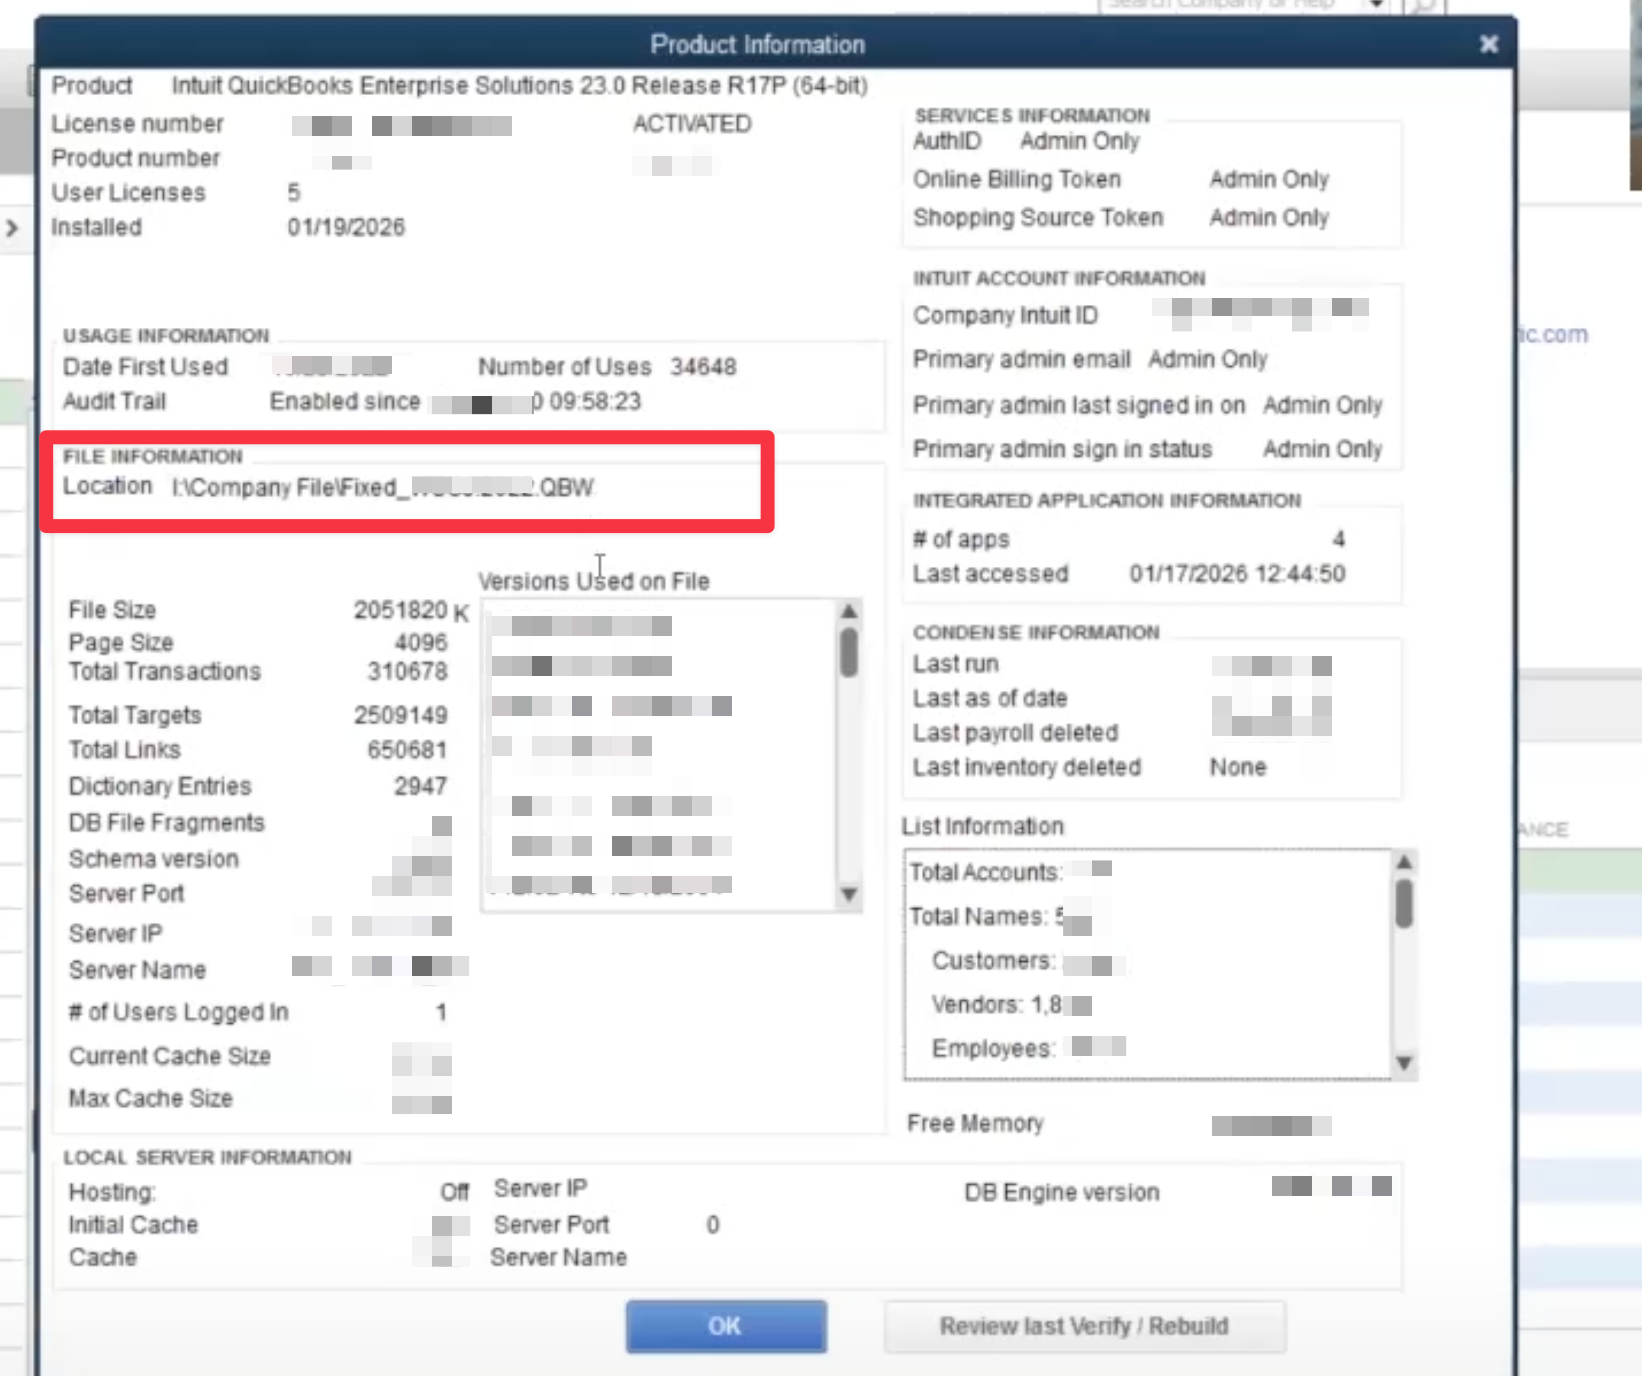
- Pressing the F2 key (or Ctrl+1) in QuickBooks Desktop opens the Product Information window, a vital tool for technical support and software management. This window displays essential details including the product name, version, license number, release, and company file location. It is also used to check the number of user seats.
- The Product Information window will display your company file path (see red box below)
-
Copy the full path (highlight and Ctrl+C) — you'll paste this into RoasterTools
Close the Product Information window before continuing setup
Connecting Quickbooks Desktop to RoasterTools
To connect your account to Quickbooks Desktop:
Step 1: Start the Integration
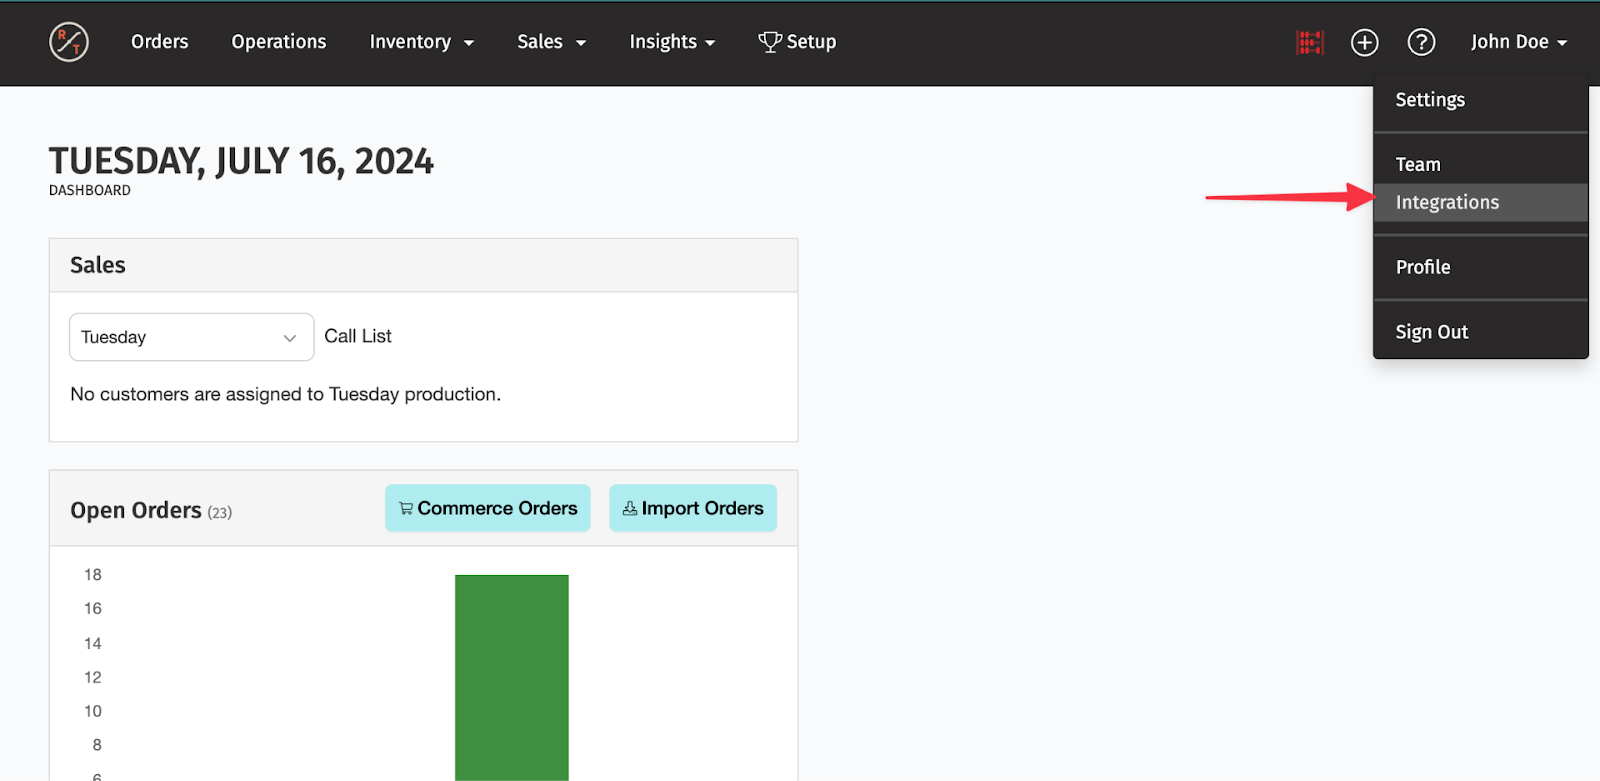
- Click your name in the top right corner of RoasterTools
- Click Integrations
- Click Add an Integration → Accounting
- Select Create a Connection next to QuickBooks Desktop
Step 2: Complete the Setup Wizard
Follow the prompts in the RoasterTools setup wizard. You'll need:
- Your QuickBooks company file path (see above for how to find it)
- QuickBooks Desktop open and running
- While in the setup Wizard you’ll be prompted to download a QWC file
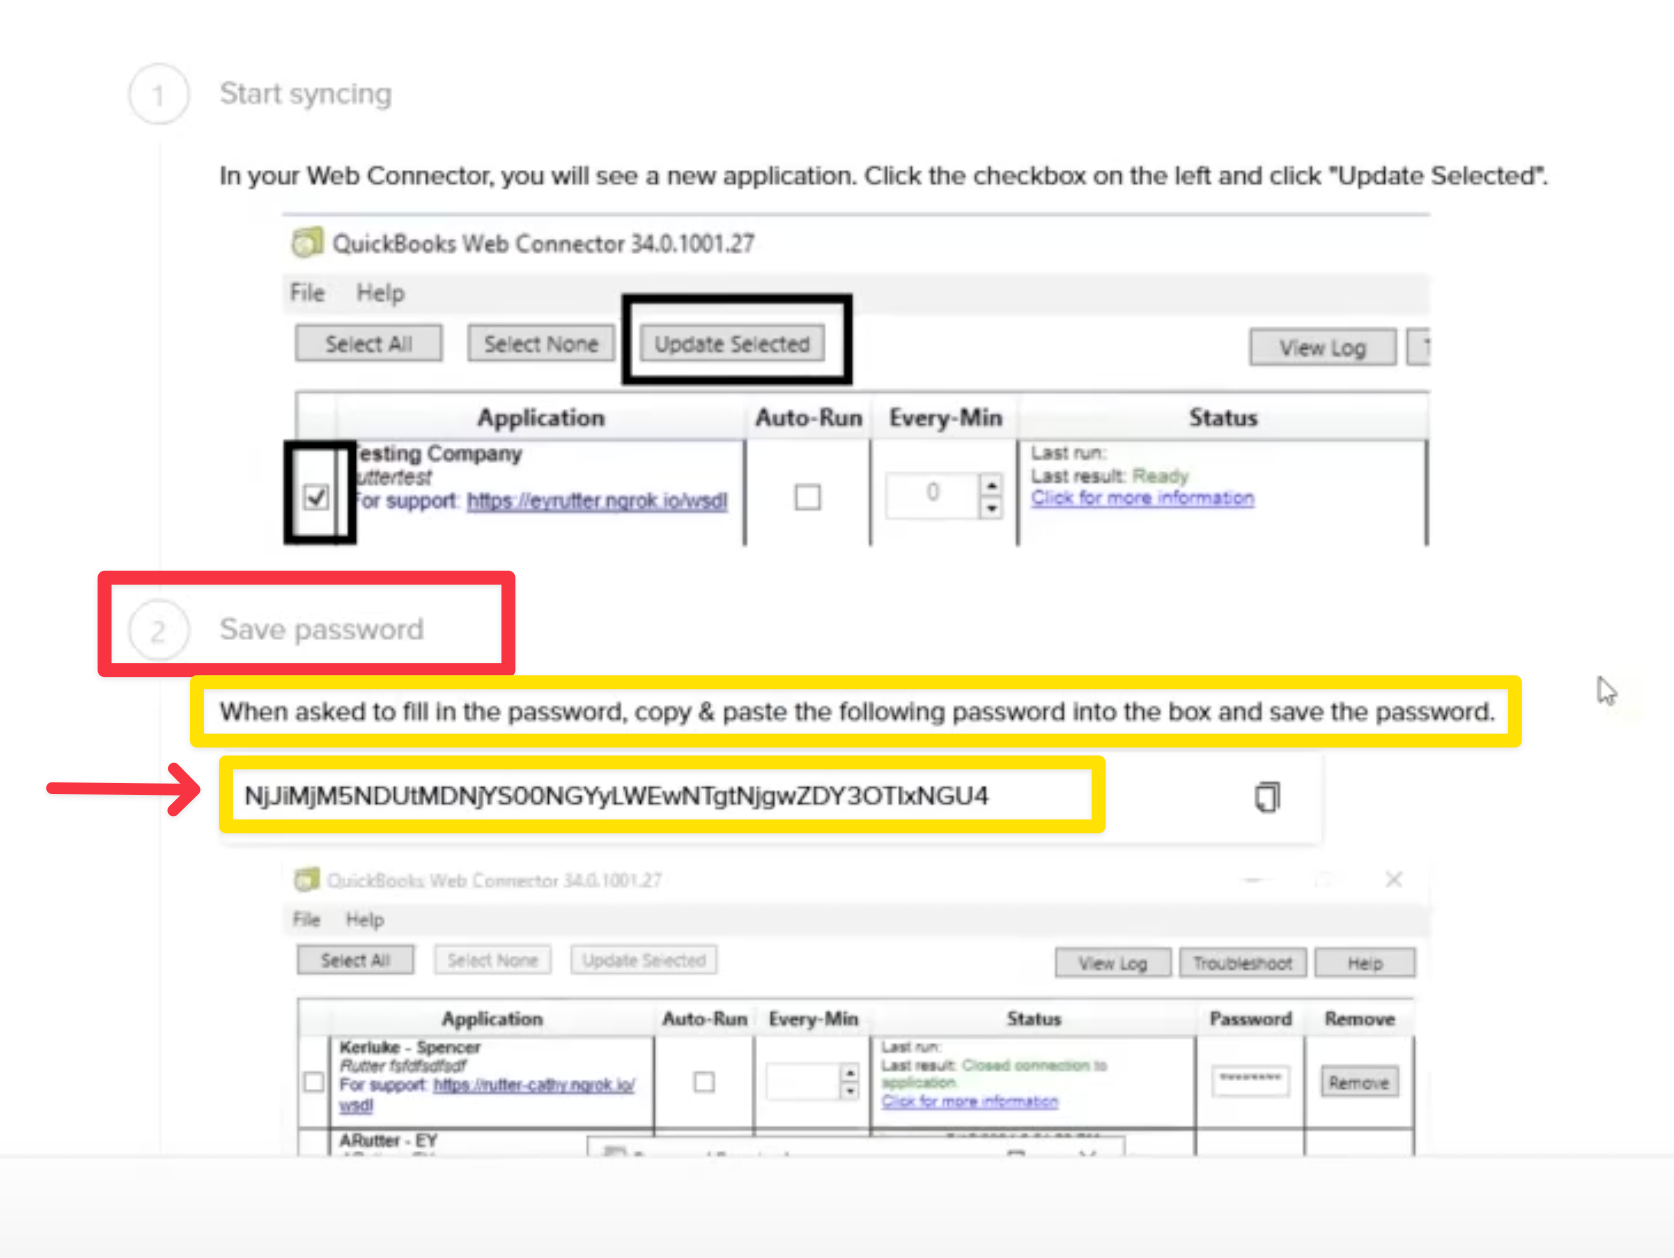
- The setup wizard will give you a password to copy and enter in your Web Connector (see image below)
Step 3: Set Up the Web Connector
-
Download the QWC file from the RoasterTools setup wizard
Tip: After downloading the QWC File, Close any extra QuickBooks windows (Product Information, folder windows, etc.) before proceeding. Open windows can interfere with the authorization prompts.
- Open the file—it will launch QuickBooks Web Connector
-
When prompted, select "Always allow access, even if QuickBooks is not running"
Why this setting?
This allows the Web Connector to sync automatically in the background without someone manually opening QuickBooks each time. RoasterTools only accesses what's needed to create invoices and sync customers — we don't access personal data, Social Security numbers, or banking information. You retain full control over sync frequency and can set your own schedule.
-
You'll be asked for a password (see image above)
⚠️ Use the unique password shown in the RoasterTools setup wizard displayed above. Click "Copy Password" to copy it.
❌ Do NOT use: Your RoasterTools Login Password or Quickbooks Password
✅ DO use: The password from the RT setup wizard (Click "Copy Password" to copy it)
If you see an error saying "host application password is incorrect," you entered the wrong password. Go back to the RoasterTools setup page and copy the correct unique password.
- Uncheck "Auto-Run" for now (red box - leave blank)
- Click "Update Selected" to start your first sync (step 2)
After Your Initial Sync Completes
Once the initial sync finishes (this may take hours (or days) - check back later or the next morning):
-
Verify the data: Check that your customers and items appear in RoasterTools
Note: This can take a bit for all data to show up, give it a few hours at least.
Name > Integrations > click on “Quickbooks Desktop” > check for data in the integration data view
- Run 2-3 manual syncs using "Update Selected" to confirm everything works
- Check sync speed: If each manual sync completes in under 60 seconds, you're ready for auto-run
Enabling Auto-Run
- In Web Connector, check the "Auto-Run" box next to your RoasterTools connection
- Set the frequency to 15 – 60 minutes
- Don't go shorter than 15 minutes (prevents overlapping syncs)
- 30 minutes is a good default for most roasters
- Keep Web Connector open—auto-run only works when it's running
Note: If you close Web Connector or restart your computer, you'll need to reopen it for auto-run to work.
Connection Status
You can see the status and health of your Accounting connection on the Integrations Page.
See full details of Connection Health and how to reconnect here
You can see in the Health Column if the connection is syncing
If you need to reconnect, you can select the three dots to review options and reconnect.
You can disconnect a connection as well from this section.

Next Steps:
Before exporting orders you will need to complete the following items:
- Import your customers -> here
- Set your preferences for exporting -> here
- Map customers and variants -> here
Using Right Networks or Other Hosted QuickBooks Desktop provider
What is Right Networks?
Right Networks is a cloud hosting provider for QuickBooks Desktop. Instead of running QuickBooks on your local office computer, your QuickBooks application and company file live on Right Networks' remote servers. You access QuickBooks through a remote desktop connection.
Why some roasters use hosted QuickBooks:
- Access QuickBooks from anywhere (not tied to one office computer)
- Multiple users can access the same company file simultaneously
- IT management and backups handled by the hosting provider
- Accountants can access your books remotely
Other similar hosting providers include Summit Hosting, Swizznet, and gotomyerp. The guidance below applies to all of them.
How Right Networks Works with Web Connector
Here's the key thing to understand: You still need a Web Connector to connect RoasterTools to QuickBooks Desktop, regardless of where QuickBooks is hosted.
|
Setup |
Where QuickBooks runs |
Where Web Connector runs |
Auto-run works? |
| Local QuickBooks | Your office computer | Your office computer | ✅ Usually yes |
| Right Networks hosted | Right Networks servers | Your computer OR Right Networks | ⚠️ Often blocked |
The Web Connector is the bridge between RoasterTools and QuickBooks Desktop. Right Networks is just where QuickBooks lives.
The Challenge: Auto-Run Often Doesn't Work
Right Networks and similar hosting providers have security restrictions that often block the Web Connector's auto-run feature. This means syncs won't happen automatically every 15-60 minutes like they would on a local setup.
Instead, you'll need to run syncs manually:
- Log into Right Networks (or open Web Connector on your local computer)
- Open QuickBooks Web Connector
- Click "Update Selected"
Where Should Web Connector Run?
You have two options:
Option A: Run Web Connector on Right Networks
- Open Web Connector inside your Right Networks remote desktop session
- Pro: Everything is in one place
- Con: Must be logged into Right Networks to run syncs
Option B: Run Web Connector on your local computer
- Install Web Connector on your office computer, connecting to QuickBooks on Right Networks
- Pro: Can run syncs without logging into Right Networks
- Con: Requires your local computer to be on
Both approaches work—choose whichever fits your workflow better.
Tips for Right Networks Users
Since auto-run may not work, we recommend:
- Set a sync schedule: Pick a regular time (e.g., Monday mornings, or daily at end of day) and stick to it
- Set a calendar reminder: So syncs don't get forgotten during busy weeks
- Designate a backup person: Someone who can run syncs during vacations or absences
- Time it right: Avoid running syncs when others are actively using QuickBooks, as it may slow things down
How to Verify Your Web Connector is Connected to RoasterTools
If for some reason there is a lapse of time from your initial setup and connecting to the web connector, you may need to verify your web connector is still connected to RoasterTools. Your connection may look active in the RT app, but we will not know if someone disconnected it.
This article shows you how to check if your QuickBooks Desktop Web Connector is properly connected to RoasterTools and what to do if it isn't.
Step 1: Open the QuickBooks Web Connector
Launch the Web Connector application on your computer.
- To open the Web Connector inside QBD
- Go to File > App Management > Update Web Services
Step 2: Check if RoasterTools is Installed
- Look in the Application column for "RoasterTools".
- If RoasterTools IS listed → Your connection is installed. Continue to Step 3.
- If RoasterTools is NOT listed → Contact RoasterTools support to set up your connection.
Step 3: Run a Sync to Verify the Connection
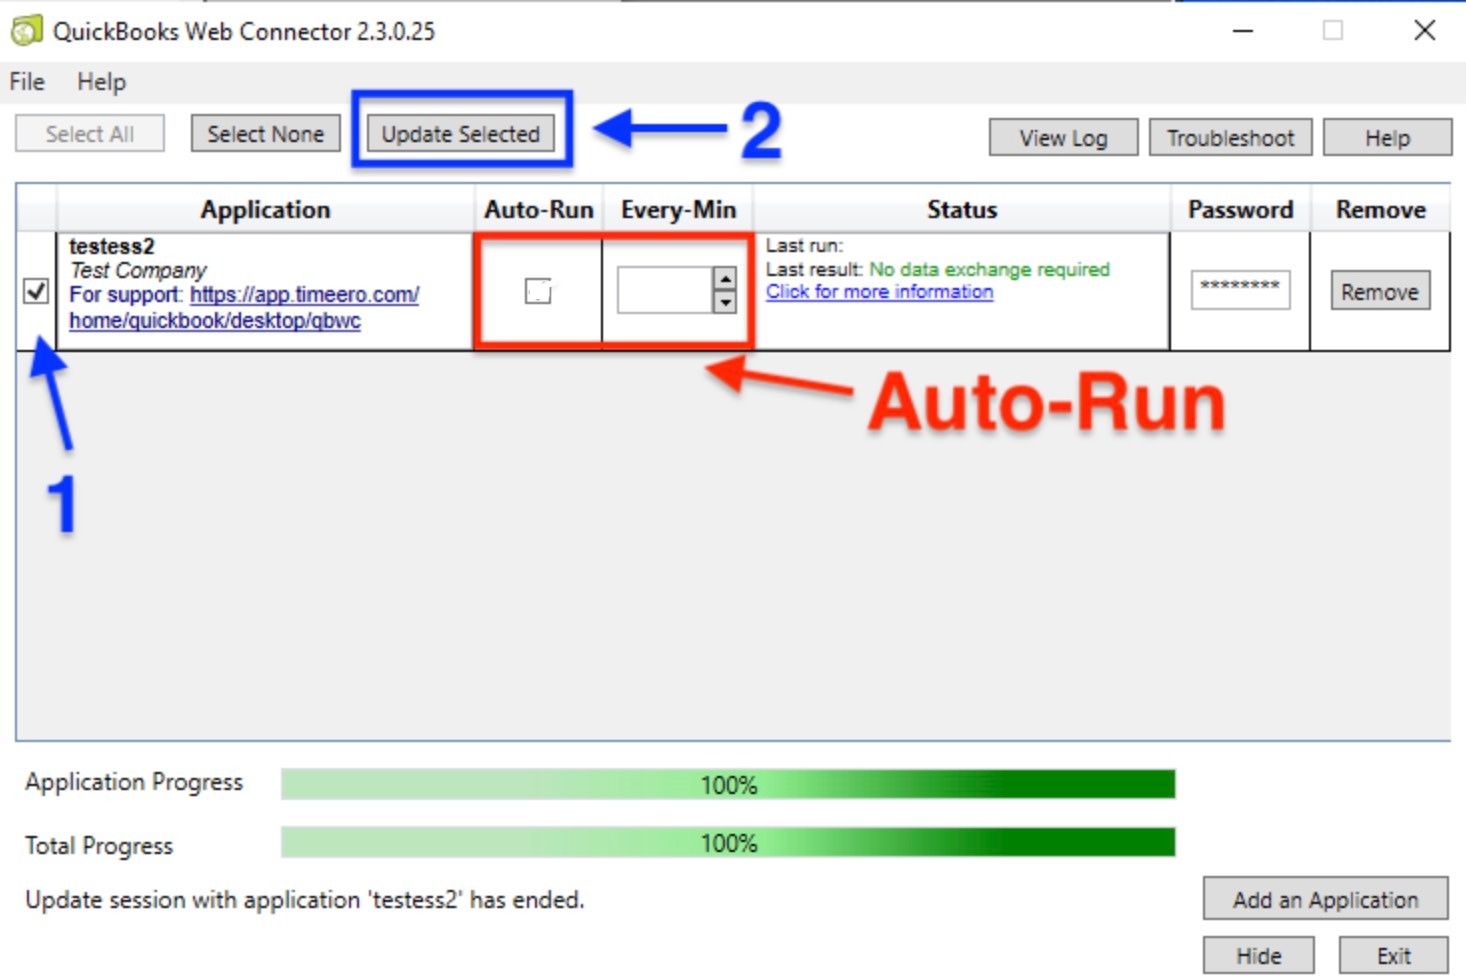
- Check the box next to RoasterTools (see blue arrow #1)
- Click "Update Selected" (see blue arrow #2 below)
- Do NOT enable Auto-Run yet — make sure the things in the red box are blank. Let the initial catch-up sync complete first
⚠️ If you haven't synced in a while, this first sync may take several minutes.
Step 4: Verify It's Working
After the initial sync completes, click "Update Selected" a few more times right away.
A healthy connection shows:
- Syncs complete in 60 seconds or less
- Progress reaches 100%
- Green indicators throughout
- Green indicators throughout
Step 5: Enable Auto-Run
Once you've confirmed quick, successful syncs:
- Enable Auto-Run for RoasterTools
- Set the interval to 15–60 minutes (start higher, then decrease as confidence grows)
Need Help?
If RoasterTools doesn't appear in your Web Connector, or syncs aren't working after following these steps, contact RoasterTools support. support@roastertools.com